Sunday 16 January 2011

Hand-in

This project has been a big experience, good and bad but I am glad to put it behind me now and take the lessons learned.

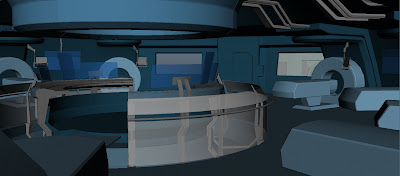
Just a reminder over what the project was: The scene is from James Camerons 'Avatar' in the first act where the lead character, Jake Sully is first connected with his avatar body. The art style is very futuristic and resembles other films such as Aliens, Star Wars and Bladerunner.

Anyway for now here are the beauty shots of the environment.


Time was the biggest disadvantage of this project I feel as I figured I had a lot more than I thought during the early stages of the project, completely underestimating the amount of time everything would take. Choosing Avatar was not the best choice as nearly everything was so complex to build and very difficult to look good.

Next time I think I would spend a lot less time on the block-out phase and just get things started stright away. Getting the lighting sorted out straight away was useful but took too much time and needed to be changed to much in the process so was kind of counter productive. Next time I will be sure to make sure I start building assets in the second or third week.


Asset Sheets


Friday 10 December 2010

10 / 12 / 2010 - Week 10 / 11

Work over the past week has really picked up the pace and set myself a task of spending at least 8 hours a day on the level figuring out new things. Texturing is now underway and trying to establish a colour palette early on in the process is crucial so I've taken a bit of time getting that just write before I dive in to everything.

One of the burdens / blessings of the environment is the high level of detail and fantastic looking assets. When it comes to texturing however it becomes a little difficult. When trying to make something clean and neat in a game engine look real is a challenge. Its hard not too give something too much of a grungy texture but yet you don't want to give it a bland boring texture. The approach I have taken is to keep things clean looking but add a very slight layer of dirt and a few scratches that might be caused from dropping objects or dragging things. The specular then brings out most of the metalic detail.

Something which will make most of the assets is getting reflections to work. Now not everything is reflective but certain assets and floors are which is very clear in the film. In the Unreal Editor last year I managed to make a doorway with slight reflectivity which gave the illusion that it was made with a reflective metal. I am debating whether to use this scheme (box map HDRI) or real-time reflections (never touched).

Camera 1: Lighting is nt set-up yet due to playing around with emissive lighting settings

.
Camera 1 (Annotated): I've highlighted a few extras that need to be altered plus the ring light in the middle isn't switch on yet (but does work as stated!).


I know you are probably thinking the lighting looks really bad at the minute but I know which direction I need to go and if I can get emissive working throughout it should look rather impressive.

After getting the collectors edition of the movie a few days ago, I rewatched it all with new scenes. It turns out that there is a large lit area in the ceiling which explains what gives the room most of its light. You only get to see the ceiling for the space of about 5 or 6 seconds in the whole film but I have a feeling its going to really help the lighting and solve the darkness issue.

One issue I was saying before was getting some objects to reflect. A friend of mine helped me create a shader for the central air conditioning unit which sort of worked but didn't. It was only a test but it would be a suitable canididate. I'm tied between using HDRI box map and apply that to the object but unsure of how to control the value of reflectivity at certain points on the object (some objects are not 100% reflective all over). The other option would be to develop this shader a little more which takes the real-time reflection fro the environment and projects it on the object. Only problem with this is objects that are circular are difficult to project on to. Any ideas of hints would be great...

That shader looks like this (thanks to James Langstone):


Using...


As you can see a flat plane projecting on to a curved object is hard especially as its meants to not have seams.

Here is a weird error going on with lightmaps / lightmass. Whenever using emmissive lightint it tends to create this blotchness. These objects have only got a simple AO applied and no texture for now it could be having a texture might fix this... But for now its a highlighted issue.


Tomorrow I am getting everything in the middle textured and finished to see if this solves the lightmass blotching problem. Sunday or the start of next week I am going to bite the bullet and make those computer screens. Once I've made 1 it shouldn't take too long to made the rest. There only needs to be three made as only two are needed in the middle (which can be dulplicated around and one beside the link machines. Once they are created thats it for techical stuff and its 5 weeks of texturing and lighting!

LETS GET THIS DONE!

Saturday 4 December 2010

03 / 12 / 2010 Low-Polygon Asset and Texturing

This week has been a busy one but filled with a few problem which has slowed down development a little, especially at the point where I wanted to be at the current time. Sometimes I really which I hadn't choosen the Avatar environment due to its complexion however I will pressure on and make it look even awesome than the official game.

Ideally I wanted to have the entire centre section of the environment finished, textured, normalled and so on but due to a few teething problems with baking this hasn't really happened. So far I have the final static mesh models with a set of unique UV's for lightmaps, with baked normal and ambient occlusion maps ready for texturing. Here is what they turned out like in the UDK.


[Despite being un-textured, the final mesh for the centre console area is coming out nicely and will look great once finished. A tiling issue with the uppoer canopy section needs to be sorted however. The ambient occlusion for some of the desk failed everytime baking in both Maya and xNormal so for the sake of time I have left it.]


[The normals on the static mesh are coming ot quite nicely]

One of the problems I have been having however is when creating a material, if I don't have a diffuse texture applied to the material when a normal is plugged in it appears dark black? So you cannot see the object at all once the material is applied to the static mesh. The only way to solve this at the minute is to apply a basic colour diffuse to the static mesh so I can see in the environment. I don't seem to recall this problem with UT3 and is a little annoying if you want to preview something without a diffuse and just a normal map.

Like I said before about slow progress this week due to problems, mainly down to high-low baking problems. The desk I had an issue with when using xNormal to make both normal and AO to the low-poly saying there was an n-gon face in the mesh and couldn't bake although I serearched the mesh long and hard and couldn't find one. Using Mays' transfer maps way seemed to work for normals but for the AO is failed massively and creating a mess of an ambient occlusion. This does bug me as I still am not 100% confident with baking high to low polygon models as I don't understand the problem it if goes wrong.

These problem really messed up my time shedule which has annoyed me a lot and worried me a little. My aim this week is work as hard as I can to catch up and really crack on with some texturing and I dont want to be caught out later on in the project with technical issues such as the computer screens which I feel I want to get done as soon as possible.

A sensible choice will be to post my projects on forums such as polycount and 3d-for-games to get feedback and help off others as the recent snow has rendered getting to University for help a little impossible.

Progress has been noted and its time to catch up!!!

Friday 26 November 2010

26 / 11 / 2010 Final Asset Creation and Material Research

This week I have mainly just been getting everything finalised, UV'ed and ready to texture starting from the middle of the environment and working outwards. I figured starting from the the middle outwards would be the best way seeing as everything is in a circular alignment and that the computer station in the middle looks the hardest to model.

I had a few issues with baking normals to a low poly mesh due to a lack of experience. I feel this intense week of asset making has paid off and I have almost completed the central island part. I felt to really make the environment work (from looking at Mass Effect a lot), most stuff is going to have to be high-to-low baked to really sell the environment and give some awesome detail.

Here are a few things I have been experimenting with using a high detailed model and baking it on to a low detail model.


Low Poly Model UV'ed


High Poly model to be baked to the Low Poly using sub-div techniques


Low-poly with the High-Poly baked on via a normal map at 1024x1024 (however most likely will be reduced to 512x512)


The main aim of doing this was to make asset creation quick as the high-detail models will highlight where most of the detail will be when it comes to the diffuse maps. I kept on using the same technique to create the rest of the central control area using high-poly bake normal maps and this is the result:


This is the central control area (without canopy) all UV'ed, normaled and ready to texture. Total polycount is 12,000 triangles and has been optimised as best as possible. The trench section is in quarters duplicated around, the support pillars are indivual pieces copied around and the desk is cut in half with each panel between the support pillars duplicated with the same UV set.


The central section is near enough complete. The entire section is mostly in quarters duplicated around.


Just an example of the edge flow

Now the central area is near enough complete, just the flooring, computers, desk chairs, bridges and railings to complete. Once everything has its final UV map, normals and possibly an ambient occlusion I will texture this part to use as a guideline for the rest of the room.

Research in to creating shaders for the holographic displays is in the beginning stages. After talking about it with some others there are certain ways for doing it using shaders in UDK. One tutorial that might be useful ( shown to me by my tutor David Wilson):


More research in to these shaders will happen over the course of next week and I wish to maybe even get started on creating the shaders for the monitors. I'm thinking of making two variations of each monitor (of which there are three main monitors, two small ones which may stay static). I'm just going to have to dive in to the deep end as shaders are a weak point of mine but I am very eager to make this work!

As for the meshes, I hope to get the central section done as soon as possible (hopefully by the end of the weekend so I can start working on the rest of the room. A real flow is starting to develop now which means each asset is getting quicker and quicker to develop. Lighting is something I also wish to play with as I add in the final assets.

Thanks for reading, please leave any comments you wish!

Friday 19 November 2010

19 / 11 / 2010 Post Alpha Presentation Recap and Final Asset creation phase

Ok, so we are now past the Alpha presentation stage in this project and have a clear idea in which direction everything needs to take now. Although I am not as far as I would like to be in this project which has been noted and will push me harder to get everything done as soon as, but I do feel that the presentation to my peers went as well as it could. I focused on explaining what phase I am at now, the issues that I have been facing, if I am following the project time scale and what needs to be done before everything is completed in a number of weeks time. I made sure to explain the problems that I have been having and which have been the reason for being a little behind shedule, one of the major factors was lack of knowledge in UDK.

In the last few weeks I've picked up my pace in UDK and started to get used to how it all works which means my work flow has sped up a great deal. Watching the UDK tutorials on lighting from Eat3D (mentioned in my last blog post) has helped give me an understanding of lighting, light maps and lightmass. A general lighting blockout has been made for the level now, which gives a general idea of how it will play out but the basic colours applied to the geometry I feel is incorrect which doesn't do justice to the lighting system. As assets now start to get textured and inserted in to the level, I know now to make everything look a lot more grey / metalic rather than blue. This mistake could have saved me a lot of time as instead of blocking the colour out I might have texutred everything first in that colour... which would have screwed things up big time.

Here are a few updated images of where the level is at the minute that was shown at the Alpha event:


Beatuy Shot # 1

This image here is the first official beauty shot of the environment (although a fly through is also now planned for the level). You can see the basic lighting blockout to get a general feel of how the level might feel though the blockout colours are wrong.


Beauty Shot # 2:

A more panaromic shot which is aimed to show off the centre area and also the window in to the Clean room. The bounce lights coming off the link machines though is working rather well.


Beauty Shot # 3:

The clean room is a little bare at the current stage and needs to be worked on a lot more. Currently most things aren't that accurate and are still blockouts but I am confident that it shouldn't take too long to get this room done.


An example of the computer screens and how the finals could look once they are in the environment. Hopefully I should be able to get emissive lighting to work with them which should really boost the environment!


An example of an emissive lighting problem where it was applied to one of the lights above the window and caused this... As you can see it flooded the environment with blue light and caused the lightmaps in the clean room to screw up.

Now is the time for things to crack on get things done and so I have started to create the final assets and getting them in to the game. To begin with I have constructed the canopy type object covering the central area and my aim of getting it done as soon as possible. In the end I mamanged to get it done in less than half a day, including building a high-poly to bake down on to the low poly. All that needs to be done now is texture that asset but I'm going to wait until I have the whole central area modelled and normalled first so I get a consistant texture style going.

Here is what I have done so far:


High Polygon creation of the canopy over the central section. Time take: 1.5 hours max


Low Polygon creation with baked normals / occlusion. Note there are some errors with the AO / normals but these can be ironed out in photoshop. It is actually just a quarter of this piece but I have duplicated it around so you can get an idea of how it will look. This is to optimise the maximum amount of UV space and light maps. Time taken: 30 minutes - 1 hour (taking bake times in to consideration).

I now know it will be quite to get these assets done and into the environment so my aim is to get everything done as soon as possible so I can play around with things later.

As for now I am away for the weekend and will pick things back up for an intense session on Monday!

Thanks for looking!

Friday 12 November 2010

12 / 11 / 2010 - Preparation and crunch for Alpha Presentation

The past week has been getting the whole place blocked out, simply UV'ed (for a lightmass / lightmap blockout) and coloured just to get a general quick feel of what finished geometry will look like. Personally I feel that although nothing final has been produced yet a lot of the hard work has been done at this end.

At the current state it needs to be imported in to UDK which I aim to do straight after posting this blog post.Then I can start to get a lighting blockout completed. Each item has been broken down in to modular pieces so lightmaps will have the highest resolution they can get. Lighting I feel is one of if not the most important aspects of a game environment thus in this project I have made it my priorty to get it sorted out first.

The next few days I have allocated towards this project as the past week I have been distracted with other things which wasn't planned, this is why you might not see much progression since the last post. I plan to get the environment into UDK for the final time and then start to blockout the lighting using the movie scene reference as a guide. Emissive is one of the main sources of light in the scene so I'm going to get them in first when I begin the lighting. The computer screens need to be made first (or at least a primitive) as they are a valid source of light that dominates the scene.

Once the lighting is done the main assets will start to get churned out which is the easy part.

I have a slight feeling that what I have done so far might be a little too small so the possibility of expanding out in to the labs is still there. Lets just see how far this 3 day crunch will get me to begin with as I hope to achieve a good 25 -30 hours of work.

Anyway for your enjoyment I will now post a few shots that will give you a better understanding of where I am at and where I am heading to.


[Here are the basic colour blocking materials applied to certain objects, nothing special but important]


[The clean room with a basic colour applied to the walls. The room is rather mono-colour as its meant to be clean sterile environment thus the bright colours (though not seen in thise screen shot well]


[ Here is the link room all blocked out with Colour, lightmaps have been applied so when its inserted in to UDK it should be easier to blockout the lighting]


[Link room again from one of the final perspectives (though a little off from being in Maya)]


Over the next three days I shall be preparing for the Alpha presentation and just cracking on to get as much done to demonstrate the potencial of the environment. Sorting the lighting out is the next task which I hope not to take too long. Next the computer screens will be made as they are the main feature of the level. Once those are complete I will start churning out the assets using high and low poly modelling techiniques while being concious of how much time I have left.


I plan to be taking a look at this Eat3D DVD on lighting this weekend as well to gain a better understanding of lighting inside UDK. (http://eat3d.com/udk_lighting)

Check back in the next few days as I hope to make a lot of progress.

Thanks for reading!

Saturday 6 November 2010

[05/11/2010] Lighting set-up / Blockout stage

After a conversation with Nathan Alderson (Eurocom) and Dave Wilson (Industry Lecturer) last Monday, I found the next stage in development for the project will be getting the lighting all blocked out. We found when looking at reference for the environment that lighting is going to be a strong point when everything is finished, using lots of emissive light sources and boucing lights.

This is a new avenue as I'm not used to setting up the lighting before building all the assets first but I can definately see the logic. Setting up the lighting, getting details in there such as brightness, colour, bouncing lights and emmisive light coming from objects (Computer monitors, medical equipment) will make asset creation and how much detail REALLY needs to be put in to certain assets a lot clearer. There might be certain regions that are not lit well enough to show off any high details on an asset, so more time should be spent on assets that are highlighted by the lighting set-up.

I've very quickly highlighted a few light sources in the scene that will help blocking out in UDK:


[Annotated shot for lighting]

At the minute I feel things are running a little behind shedule with lack of knowledge of certain areas. However its now a real push to get a lighthing blockout done ASAP so I can get started with asset creation sometime next week.

Lighting is something I struggle with however I have aquired a lighting tutorial in UDK from Eat3D which I will watch in the next day or two. According to my peers its rather good! (Eat3d - UDK Lighting)

I've started to think about how I can build everything as modular as I can to save time and effort, being that lighting is something that really makes a game environment. The floor has been seperated in to sections that can be copied around. The same goes with wall pieces and all sorts of different assests.


[An example using blockout pieces of how everything will fit together modulary]

Currently I am cutting down the blockout in to modular parts, giving a very simple UV set which will help with lightmaps and getting lighting to work. A lot of pieces of the blockout just need a little touching up and will be good enough to make in to final assets, which will save time.

I aim to get the lighting blockout done as soon as possible ready to get some assets in to the level.

Its still certainly got some potential to look awesome!

Thanks for reading and leave any comments you may have! Good or bad!

Noel